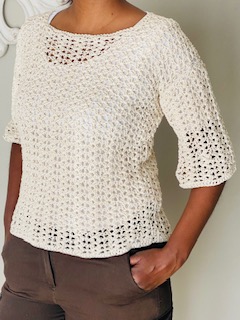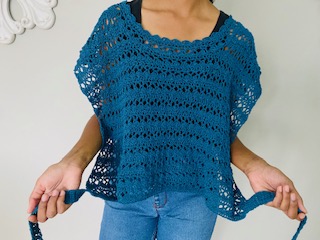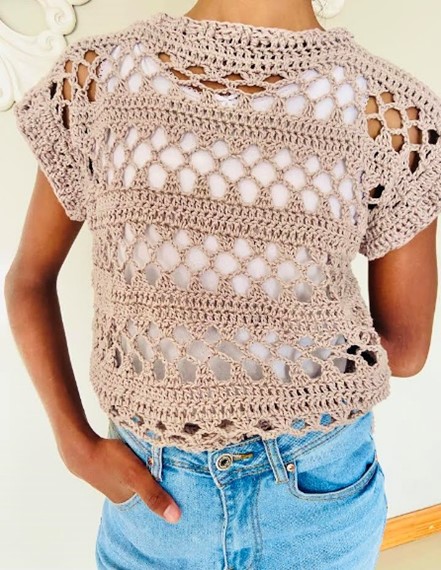
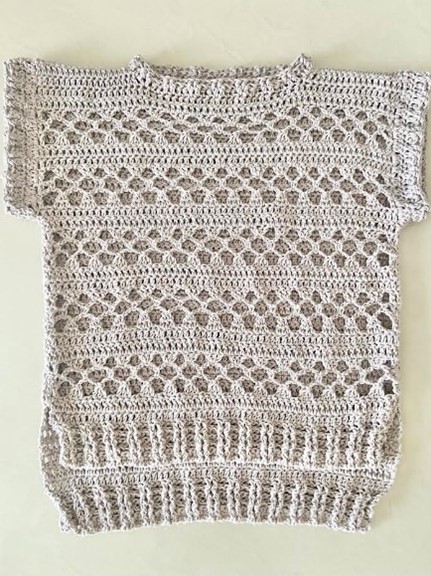
This tee/top… call it whatever you fancy, was so easy to work up. I used cotton yarns for this as I generally tend to go for cottons for warmer weather patterns and acrylics for cooler weather patterns, although this pattern works well with both cottons or acrylics.
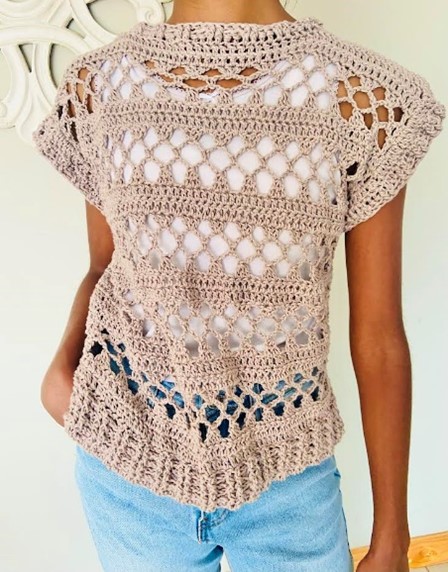
I was inspired by the high/low hemline on tees and really needed to work one up one in crochet. This pattern is so adaptable, you can work it for almost every size because I’ve worked the pattern using body measurements and that’s my go to way of working patterns as I feel, I get a better overall fit on the finished piece.
Pattern Notes
- The Crochet Tee/Top pattern is for sizes from 2 year olds to adult 5XL
- All measurements are provided for in the pattern – choose your measurements for your size in order to work the pattern
- This pattern makes use of US crochet terminology
- Measurements are in inches and centimetres
- ch3 counts as a stitch (dc) – Always work a stitch into the ch3 turning chain in order to prevent the piece from going askew
- 3dc means working 3 double crochets all into one chain
- Stitch pattern is in multiples of 4
- Basic stitches (need to know in order to work the pattern) – single crochet, double crochet, front post double crochet, back post double crochet
Stitches and Abbreviations
ch/ch’s = chain/s
st/ st’s = stitch/ es
R = Round
sc = single crochet
dc = double crochet
fpdc = front post double crochet
bpdc = back post double crochet
3udc = 3 unfinished double crochet
sl st = slip stitch
sk = skip
sp/ sp’s = space /s
SM = stitch marker
yo = yarn over
Special Stitches
3 x unfinished double crochet (3udc)– yo, insert the hook into the st, pull up a loop, yo, go through 2 loops on the hook (you now have 2 loops remaining on the hook), yo, insert the hook into the next st, pull up a loop, yo, go through 2 loops on the hook (you now have 3 loops remaining on the hook), yo, insert the hook into the next st, pull up a loop, yo, go through 2 loops on the hook (you now have 4 loops on the hook), yo, go through all 4 loops on the hook to complete the stitch
Materials
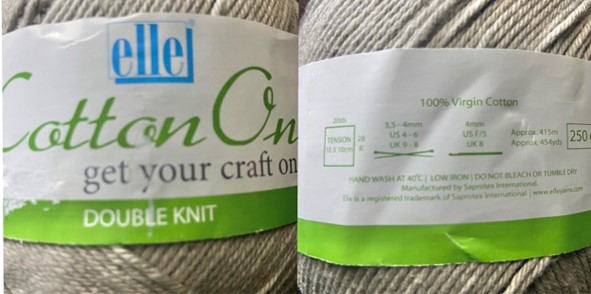
Image of the yarn that I used
Yarn/ wool – 100% cotton – Double Knitting/light worsted/category 3 (approx. 300g to 600g for adult sizes– less than 300g for child/ teen sizes (also dependant on length))
4mm crochet hook (which was the recommended hook on the label), Stitch markers, Scissors, Measuring tape, Yarn/ wool needle
- Note: you may use 4ply or light yarns – use the recommended hook as stated on the label
Video Tutorial YouTube
Check out https://youtu.be/u3ZJieHcvT4
Crochet Tee/Top with a high/low hemline
Pattern
Foundation chain
Step 1:
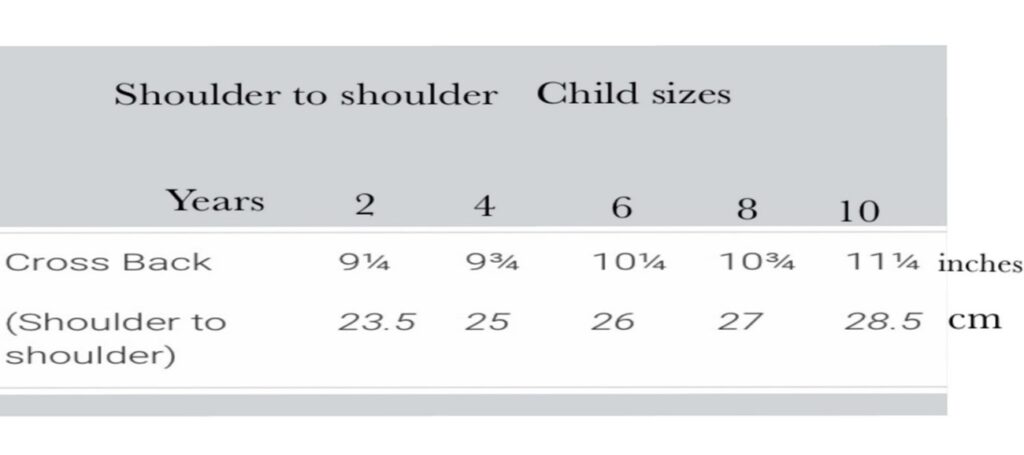
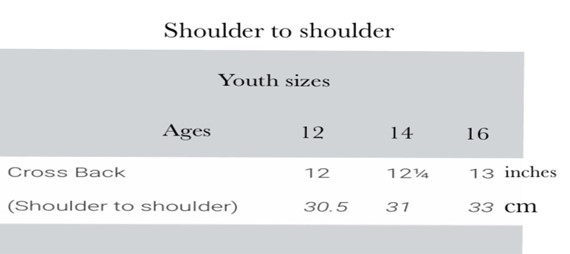
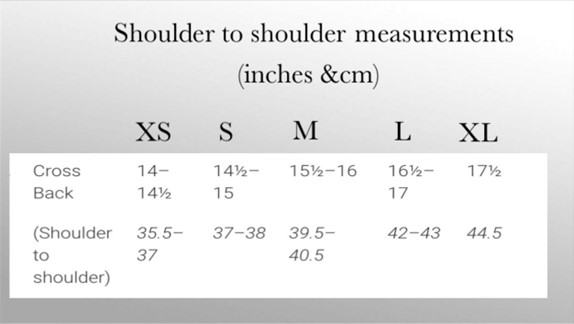
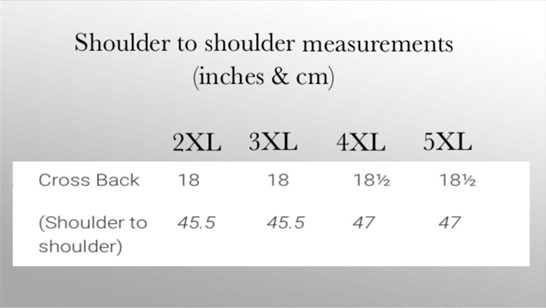
Chain a length of chains to measure the shoulder to shoulder measurement for your size
ADULT SIZES
Step2:
Once the length of chains measures the shoulder to shoulder measurement, count the number of chains and adjust it to a multiple of 4 – decrease to adjust if necessary
Step3:
Now, add on a further 3 chains (Tip: Make note of the total number of chains you are using as you will need this number for the front panel)
Ribbing (work ribbing for both back and front panel)
R1
Into the 4th ch from the hook – dc, dc all ch’s
R2 – R5
ch3, turn, *fpdc, fpdc, bpdc, bpdc*
Repeat from *to* to the end of the R
Note: when repeating the R’s, for every fpdc that you see, work a fpdc and for every bpdc that you see, work a bpdc
Back Panel – continuing from Ribbing
R1
ch3, turn, dc all st’s
Repeat R1 to desired length
Note: when it comes to the length, keep in mind that the back panel is longer than the front panel in order to achieve that high/low hemline
Once you have your desired length of the back panel, fasten off, cut off the excess yarn
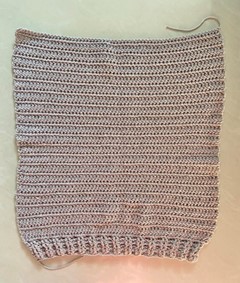
Back panel complete
Front Panel – continuing from Ribbing
R1 and R2
ch3, turn, dc all st’s
R3
ch3, turn, dc, *ch5, sk1, 3udc*
Repeat from *to* ending with ch5, sk1, dc, dc
R4
ch3, turn, dc, *ch1, sc into the 3rd ch from ch5*
Repeat from *to* ending with ch1, dc, dc
R5
ch3, turn, dc, *ch1, 3dc into the 3rd ch from ch5*
Repeat from *to* ending with ch1, dc, dc
R6
ch3, turn, dc into all dc’s – dc into all ch1’s
Repeat R2 – R6 to desired length
- Note: Use the back panel as a guide to get the length of the front panel
Place the front panel on top of the back panel with the ribbing and 2 Rounds’s of dc sticking out at the bottom (so the front panel will be placed higher up than the back panel – to create that high/low hemline)
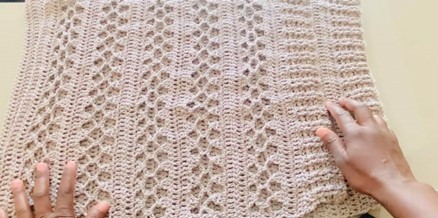
At the top (shoulder/neckline), the front panel should be 2Round’s less than the back panel
Shoulder (side 1)
Continuing from Front panel – you will work as many st’s to match your shoulder or for the size you are making
R1
ch3, turn, dc to complete shoulder
R2
ch3, turn, dc to complete shoulder
Fasten off – cut off excess yarn (tip: leave a long enough tail to help seam along the shoulder)
Shoulder (side 2)
Count the number of st’s worked for shoulder side 1. Use the same number to work shoulder side 2
Attach yarn to the opposite side of the front panel (top edge)
R1
ch3, dc to complete shoulder (same number of st’s as side 1)
R2
ch3, turn, dc to complete shoulder
Fasten off – cut off excess yarn (tip: leave a long enough tail to help seam along the shoulder)
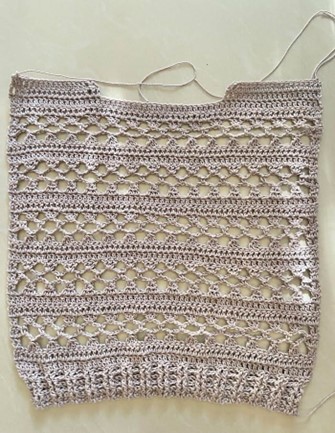
Front panel complete
With Front panel laid out flat on top of Back panel – seam along the shoulders to join the back and front panels
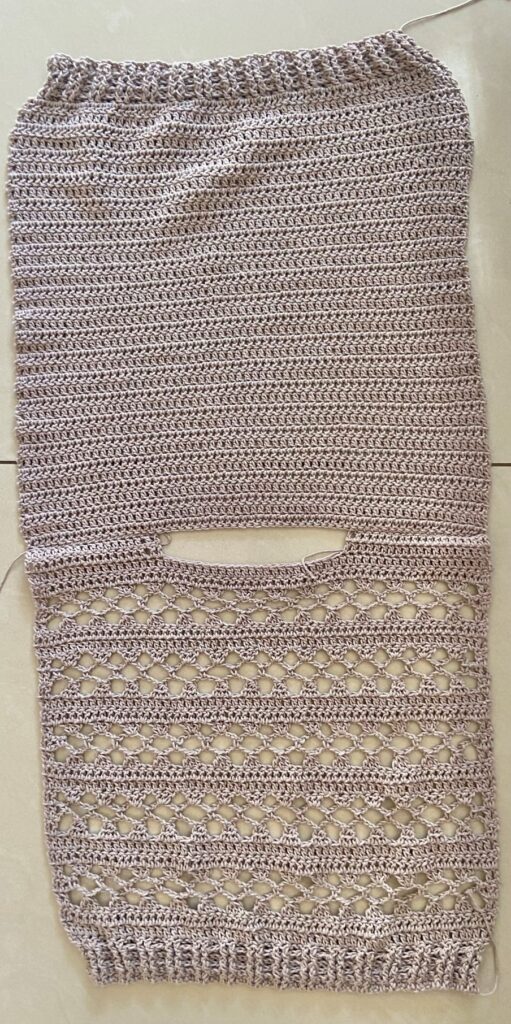
Now mark off the armhole depths for the size you are making – as shown in the images below
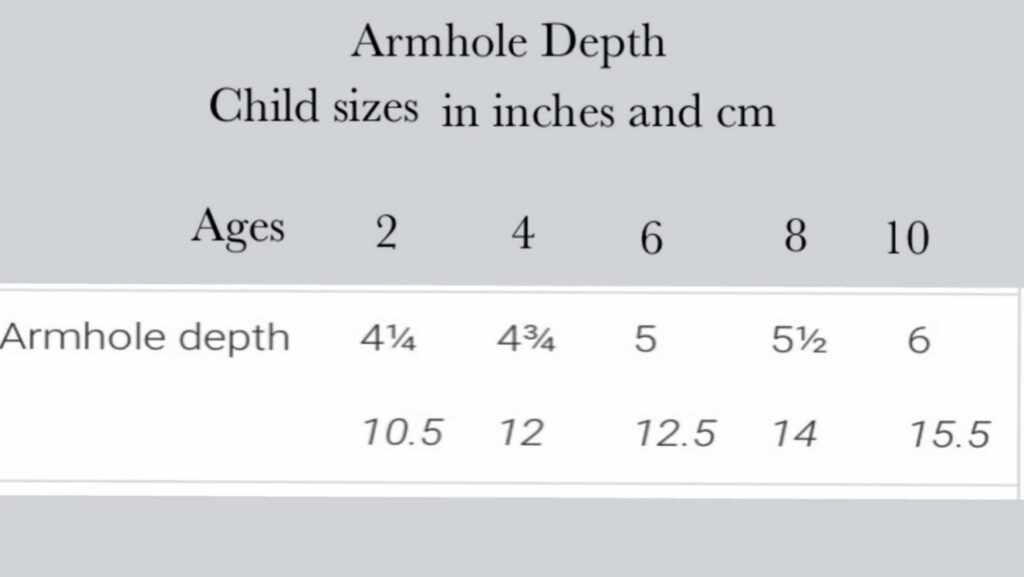
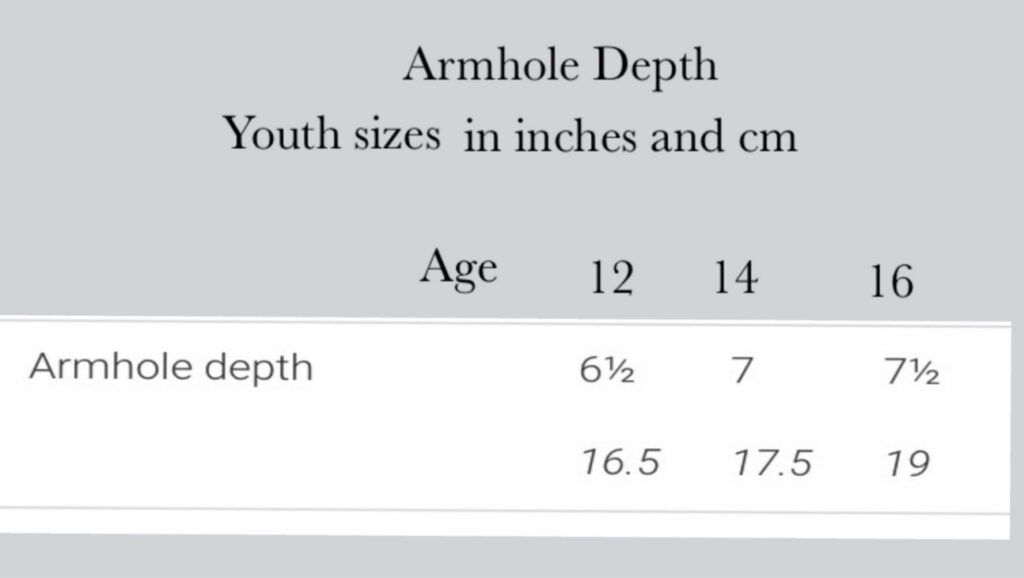
Adult sizes
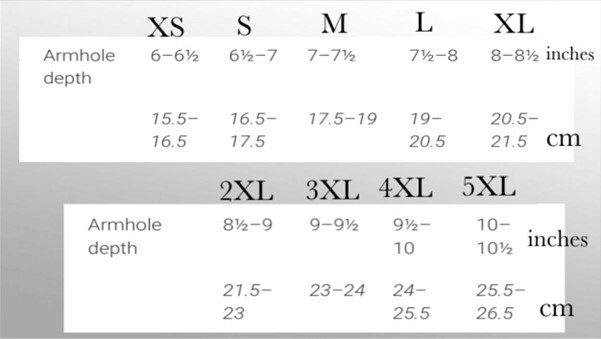
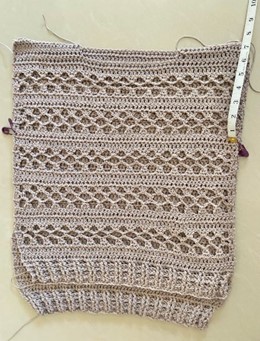
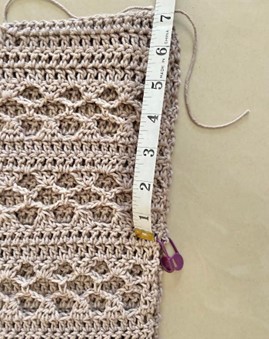
Seam along the sides of the Top working from SM to bottom leaving the last 2 R’s of dc and ribbing unstitched to create a slit on the sides of the Top
Armhole edging
Attach yarn to the underarm
R1
ch3, dc all around the armhole, sl st to join
- (note: there are no actual st’s to work with – make certain that you work your st’s evenly around the armhole)
R2
ch3, turn, dc all st’s, sl st to join
R3
ch3, turn, *fpdc, fpdc, bpdc, bpdc*
Repeat from *to* to the end of the R
Fasten off – cut off excess yarn
Repeat for the other armhole
Neckline edging
Attach yarn to the centre back of the neckline
R1
ch3, dc all around the neckline, sl st to join
R2
ch3, turn, *fpdc, fpdc, bpdc, bpdc*
Repeat from *to* to the end of the R
Fasten off, cut off excess yarn and weave in all those ends
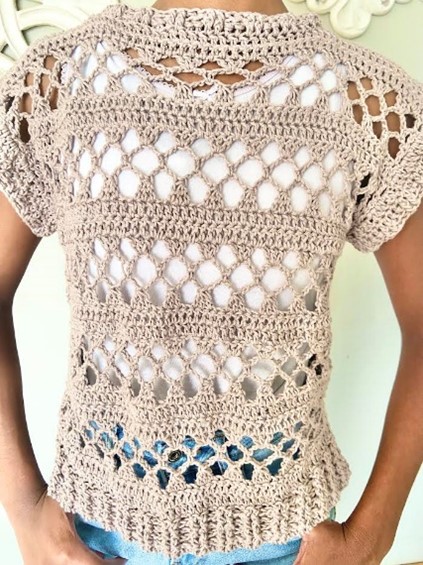
And that completes the Crochet Tee/Top with a high/Low hemline. Hoping you’ve enjoyed this pattern
