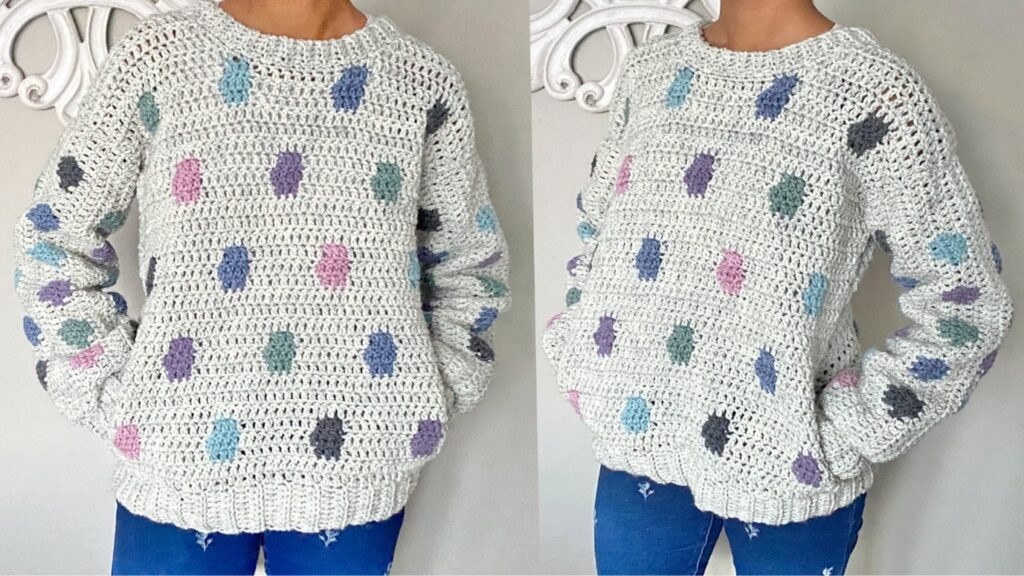
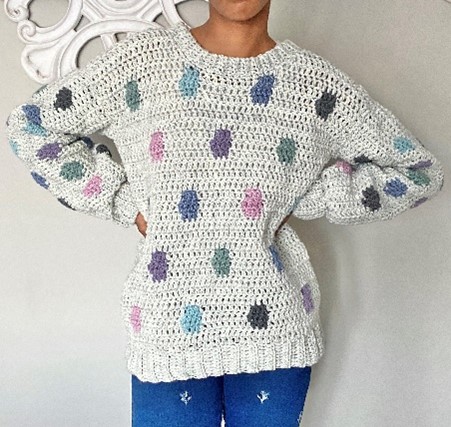
I love this sweater, everything about it. The hard not to notice polka dots, the way it fits perfectly to the body measurements. I especially love the side pockets. They are slightly slanted for a more comfortable fit of the hands into the pocket. I made certain that my pattern and tutorial was in-depth to make a pattern that looks deceivingly difficult, easy!
Pattern Notes
- This sweater is made using one’s own body measurements – All standard measurements are given in the pattern
- This pattern makes use of US crochet terminology
- Measurements are in inches and centimetres
- This pattern is for sizes:
- Women XS to 5XL
- Youth 12 yrs to 14yrs
- Child 2 yrs to 10 yrs
- Find measurements (shoulder to shoulder, sleeve length and armhole depth) in the pattern (Pages 7, 15, 16, 17, 18)
- You will need to take your own measurements for the pocket placement, width of the pocket and shoulder measurement – I will show you how to in the pattern (see page 11)
- I used an Aran/Worsted (category 4) yarn, however, using a Double Knit/Light worsted/ category 3 yarn is totally acceptable. It is important though, that you keep to the same weight of yarn throughout the pattern – use a 5mm hook and one size smaller for the Ribbings
- dc3/ dc5, etc means 3 or 5, etc double crochets worked in the same/ base colour yarn
- brackets indicate stitches to be worked in the change of colour example (dc3) or (dc4) – you will change the colour of the yarn to work the Polka Dot pattern which is indicated by ( ) either working 3 dc’s or 4 dc’s – Page 25 – 26 How to change yarn
- ch2 counts as a stitch – double crochet – UNLESS OTHERWISE STATED (with regard to ch2 at the neckline)
- Decrease – yo, insert hook into 1st st, pull up a loop, insert hook into 2nd st, pull up a loop, yo, go through 3 loops on the hook, yo, go through 2 loops on the hook
- Increase – work 2 stitches into 1 stitch
- Decide on your chosen colours ie, the base colour and the colours of the Polka Dots – The Polka Dots are indicated in brackets ( ) in the pattern – See Swatch (Page 6) on how to get the lengths of yarn needed for the Polka Dots
- Note – the pattern is the same for both Back and Front Panels up until the shoulders, therefore work 2 matching Panels ie, one for the Back and one for the Front and thereafter the pattern splits
Stitches and Abbreviations
ch/ ch’s = chain/s
st/ st’s = stitch/ stitches
sc/ sc’s = single crochet/ s
hdc = half double crochet
dc = double crochet
sk = skip
sl st = slip stitch
sp/s = space/es
WS = Wrong side
RS = Right Side
R = Round
SM = Stitch marker
decr = decrease
incr = increase
yo = yarn over
blo = back loop only
Materials
Yarn/ wool Category 4/ Worsted weight/Aran (I used approx. 600g in total for a size Small, also depending on the length)
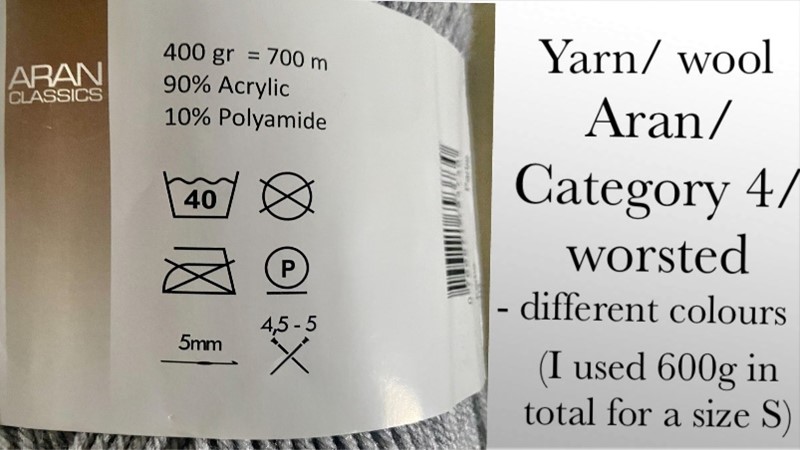
*Image of the Yarn/ Wool I used*
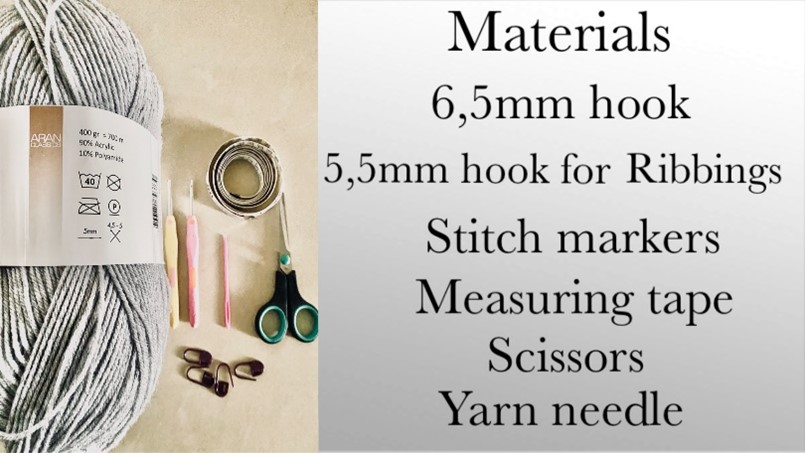
Crochet hook 6,5mm & 5,5mm
Scissors
Stitch markers
Measuring tape
Yarn/ wool needle
Video Tutorials
- Crochet Sweater “Polka Dot” – Tutorial
Check out https://youtu.be/MEuX4UcFock
- Introduction to my Polka Dot Series – Tutorial on the stitch pattern, changing yarn colours and cutting of yarn lengths.
Check out https://youtu.be/EPTL7MaovA
Swatch
ch11
R1
Into the 4th st from the hook dc, dc all chs
R2
ch3, turn, dc3, (dc3), dc4
R3
ch3, turn, dc2, (dc5), dc3
R4
ch3, turn, dc3, (dc3), dc4
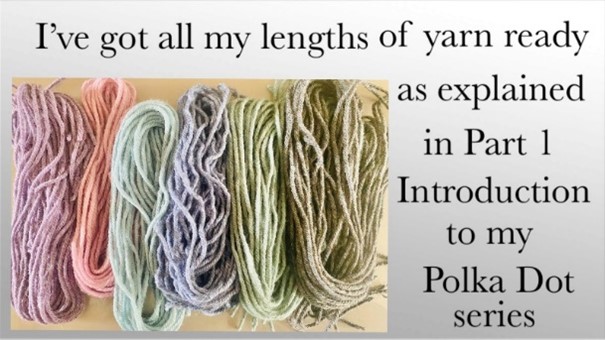
Open the swatch – take note of the length of yarn used for the change of colour (st’s in brackets), add on an 8”allowance. Now you have an idea of the lengths of yarn needed to form the Polka Dots
Tip: Prepare the lengths of yarn for the Polka Dots in advance
Note : This pattern differs slightly from the Introduction video tutorial but that does not affect the outcome
Pattern
Back and Front Panels
Ribbing – Using the 5,5mm hook
ch11
R1
Into the 3rd ch from the hook – hdc, hdc all ch’s
R2
ch2, turn, hdc all st’s (blo) – 10 st’s
Repeat R2 until the length of the Ribbing measures the Shoulder to Shoulder measurement + 2” or 5cm
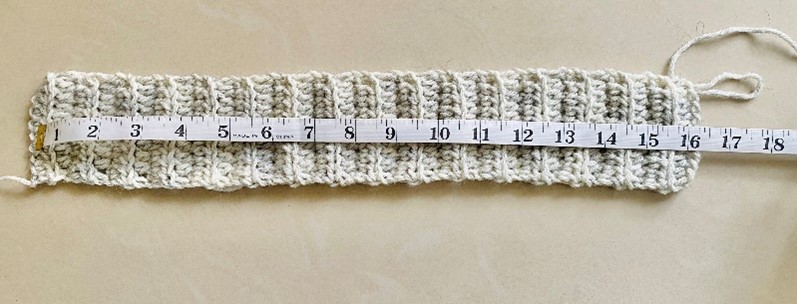
Ribbing for a size Small
Shoulder to shoulder measurements
WOMENS MEASUREMENTS :
XS 14,5 inches 37cm
S 15 inches 38cm
M 16 inches 40,5cm
L 17 inches 43cm
XL 17,5 inches 44,5cm
2X 18 inches 45,5cm
3X 18 inches 45,5cm
4X 18,5 inches 47cm
5X 18,5 inches 47cm
YOUTH MEASUREMENTS :
12yrs 12 inches 30,5cm
14yrs 12,3 inches 31cm
CHILD MEASUREMENTS :
2yrs 9,5 inches 24cm
4yrs 9,7 inches 25cm
6yrs 10,3 inches 26cm
8yrs 10,7 inches 27cm
10yrs 11,3 inches 28.5cm
Back and Front Panels – Lower Body – using the 6,5mm hook
Continuing from Ribbing – working lengthwise along the top edge
R1
ch2, turn, work 3 dc’s per 2 Rounds of Ribbing
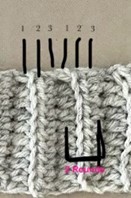
Count the number of stitches and adjust the stitch count to a multiple of 12 + 3 in R2
R2
ch2, turn, dc all st’s – incr or decr to adjust the stitch count to a multiple of 12 + 3
(Tip – If you need to work fewer increases to adjust the st count, then increase instead of decreasing, vice versa)
R3
ch2, turn, dc5, (dc3), *dc9, (dc3)*
Repeat from *to* ending with dc6
R4
ch2, turn, dc4, (dc4), *dc8, (dc4)*
Repeat from *to* ending with dc6
R5
ch2, turn, dc5, (dc3), *dc9, (dc3)*
Repeat from *to* ending with dc6
R6
ch2, turn, dc into all st’s
R7
ch2, turn, dc into all st’s
R8
ch2, turn, dc into all st’s
R9
ch2, turn, dc11, (dc3), *dc9, (dc3)*
Repeat from *to* ending with dc12
R10
ch2, turn, dc10, (dc4), *dc8, (dc4)*
Repeat from *to* ending with dc12
R11
ch2, turn, dc11, (dc3), *dc9, (dc3)*
Repeat from *to* ending with dc12
R12
ch2, turn, dc into all st’s
R13
ch2, turn, dc into all st’s
R14
ch2, turn, dc into all st’s
Repeat R3 to R14 to required length of Sweater
IMPORTANT
- For the Back Panel, end on a R8 or R14 repeat (in other words, you will end with 3 Rounds of dc worked in the base colour
- For the Front Panel end 3 Rounds shorter than the Back Panel (in other words, you will end on a R5 or R11 repeat)
Do not fasten off – continue to the Back Shoulder (1) for the Back Panel or continue to the Front Shoulder (1) for the Front Panel
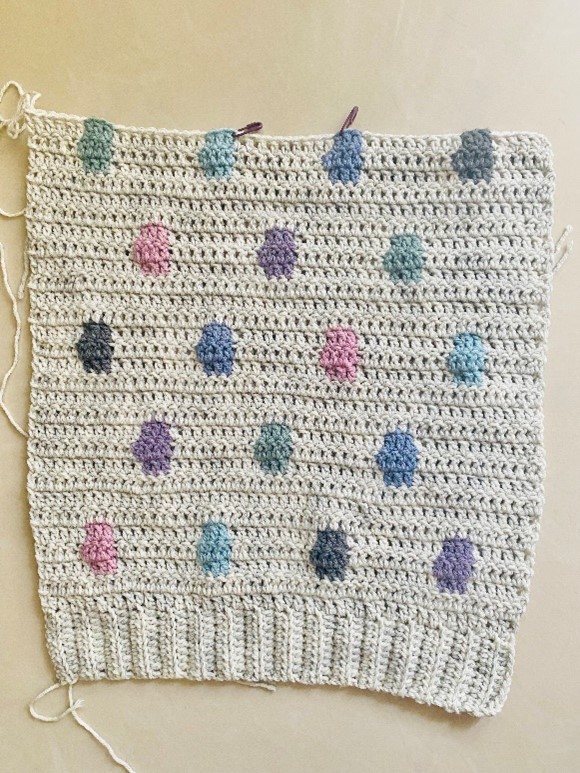
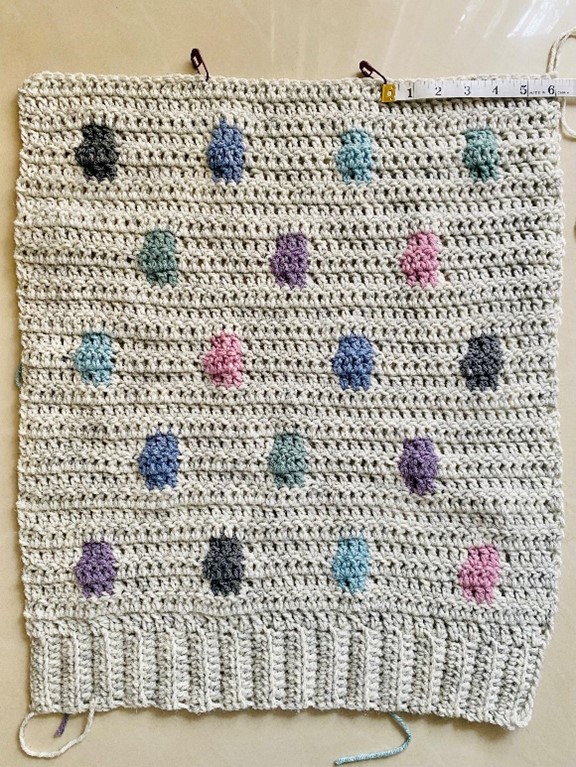
Image above – Notice that the back panel is 3 Rounds longer than the front panel
Back Shoulders
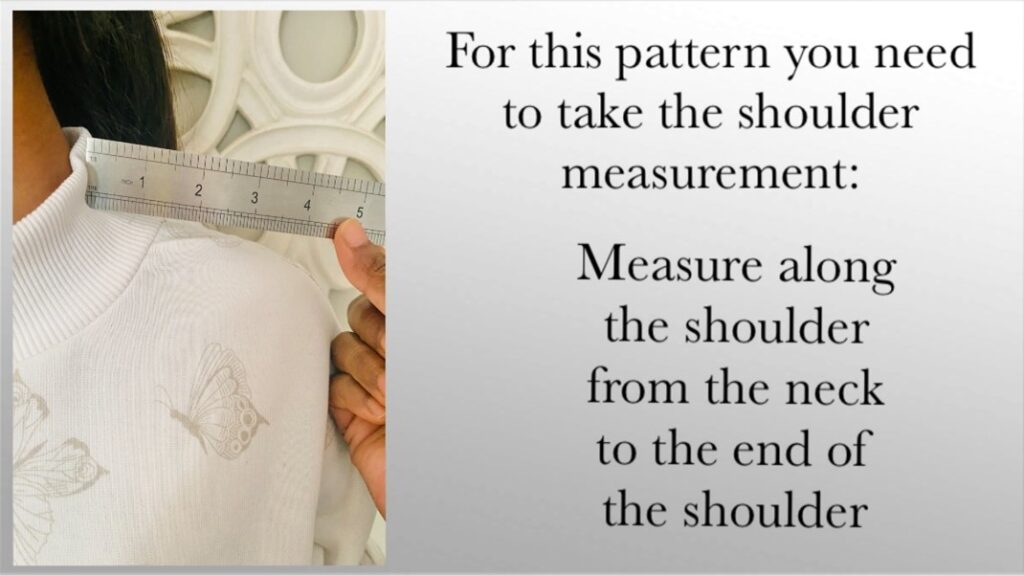
Mark out the Back Shoulder using the Shoulder measurement – see image above – Back Panel and image below for Shoulder measurement
Once you’ve marked out Shoulder (1), count the number of stitches marked off and use that number of stitches to mark off Shoulder (2)
Back Shoulder (1)
Continuing from where you had stopped
R1
ch2, turn, dc to one stitch before the SM, work a decrease into the st before the SM and the one marked off
R2
ch2 (does not count as a st), turn, dc to end
Fasten off, cut off excess yarn – leaving a long enough tail to help with the seaming
Back Shoulder (2)
Attach yarn to the opposite end
Repeat R1 and R2 as for Back Shoulder (1)
Fasten off, cut off excess yarn – leaving a long enough tail to help with the seaming
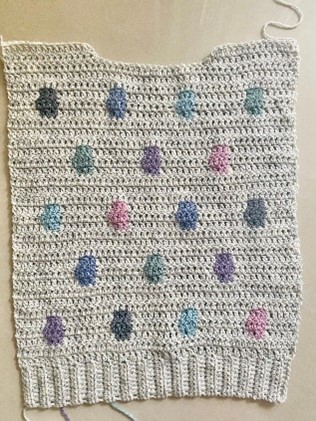
Back Panel is now complete
Front Shoulders
Mark out Front Shoulders
Use the same number of stitches as was used for Back Shoulders however add on 3 more st’s (in other words, the Front shoulder is 3 stitches more that the Back shoulder)
Mark off Shoulder (2) on the opposite side – Both Front shoulders must have the same number of stitches marked off
Front Shoulder (1)
Continuing from where you had stopped
R1
ch2, turn, dc to one stitch before the SM, work a decrease into the st before the SM and the one marked off
R2
ch2 (turning ch – does not count as a st), turn, dc to end
R3
ch2, turn, dc to last two stitches, decr
(Note – do not work the decrease into the turning ch as it does not count as a st)
R4
ch2 (turning ch – does not count as a st), turn, dc to end
R5
ch2, turn, dc to last two stitches, decr
(Note – do not work the decrease into the turning ch as it does not count as a st)
Fasten off, cut off excess yarn
Front Shoulder (2)
Attach yarn to the opposite end
Repeat R1 to R5 as for Front Shoulder (1)
Fasten off, cut off excess yarn
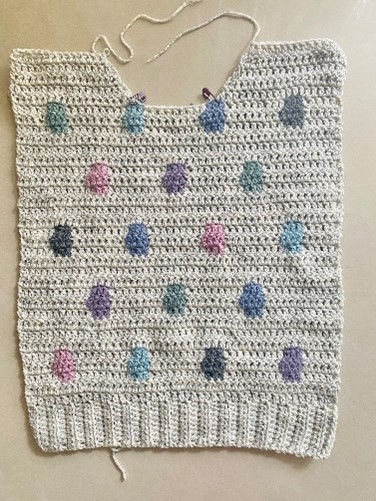
Front Panel is now complete
Sleeve – work 2 panels
Chain a length of ch’s to measure the sleeve length measurement less 1”/ 2,5cm

Image showing chains measuring sleeve length less 1” (16” for a size Small)
Sleeve Length:
WOMENS MEASUREMENTS
XS 16,5 inches 42cm
S 17 inches 43cm
M 17 inches 43cm
L 17,5 inches 44,5cm
XL 17,5 inches 44,5cm
2XL 18 inches 45,5cm
3XL 18 inches 45,5cm
4XL 18,5 inches 47cm
5XL 18,5 inches 47cm
YOUTH MEASUREMENTS
12yrs 15 inches 38cm
14yrs 16 inches 40,5cm
CHILD MEASUREMENTS
2yrs 8,5 inches 21,5cm
4yrs 10,5 inches 26,5cm
6yrs 11,5 inches 29cm
8yrs 12,5 inches 31,5cm
10yrs 13,5 inches 34,5cm
Once you have got the length correct for your size, count the number of chains and adjust the chain count to a multiple of 12 + 5
R1
Into the 4th ch from the hook – dc, dc all ch’s
R2
ch2, turn, dc all st’s
Repeat R3 to R14 (Just as was done for Back/ Front Panels) until the width of the sleeve measures twice the Armhole Depth measurement for your size
Do not end with the Polka Dot pattern unfinished – rather end with dc’s worked in the base colour
Fasten off, cut off excess yarn, leaving a long enough tail to help with the seaming
Repeat for other sleeve
Armhole Depth:
WOMENS MEASUREMENTS
XS 6,5 inches 16,5cm
S 7 inches 17,5cm
M 7,5 inches 19cm
L 8 inches 20,5cm
XL 8,5 inches 21,5cm
2XL 9 inches 23cm
3XL 9,5 inches 24cm
4XL 10 inches 25,5cm
5XL 10,5 inches 26,5cm
YOUTH MEASUREMENTS
12yrs 6,5 inches 16,5cm
14yrs 7 inches 17,5cm
CHILD MEASUREMENTS
2yrs 4,3 inches 10,5cm
4yrs 4,7 inches 12cm
6yrs 5 inches 12,5cm
8yrs 5,5 inches 14cm
10yrs 6 inches 15,5cm
Assembly of Sweater
- Seam Front Panels to Back Panel at the shoulders
- Seam Sleeve Panels to the sides – using the shoulder seam as a guide to centralise the panels
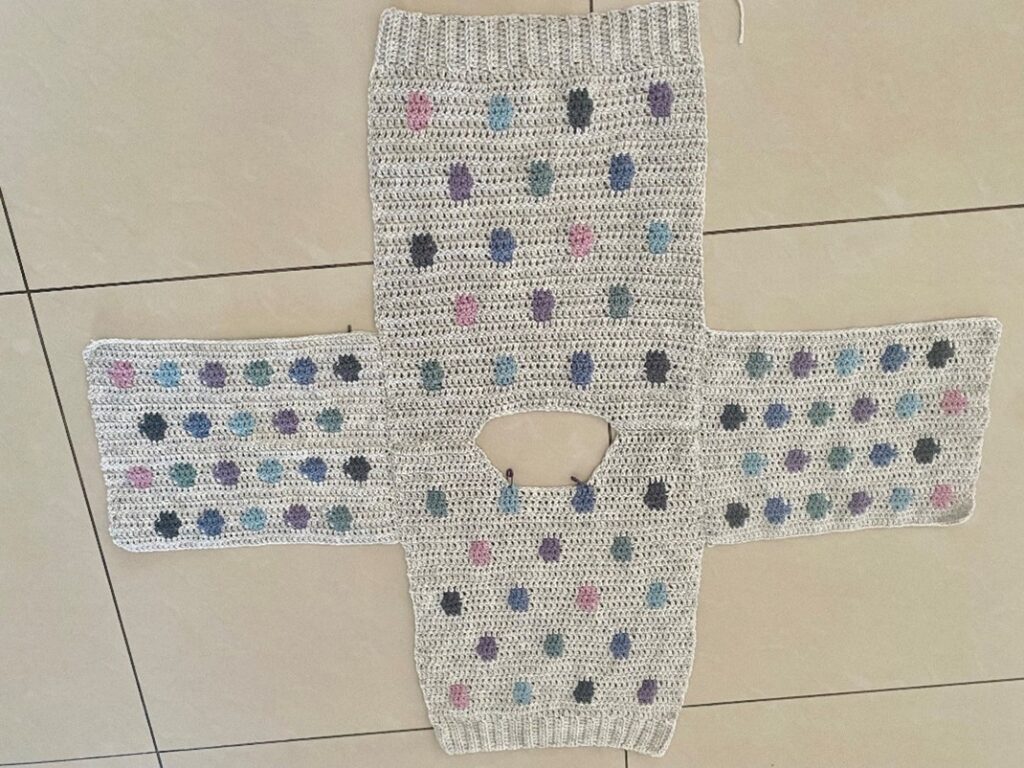
Image showing panels seamed together
Placement of Pockets
Before seaming the sides, we need to find the placement of the pockets
- Physically measure along your body to decide on a comfortable placement – the side pocket is generally in between the waist and upper hip. Measure from your underarm downwards to the waist/hip (For me it was 8”)
- Lay out the sweater flat – front panels on top of back panel – see image below
- Measure along your sweater from underarm downwards and mark off (SM1)– In the image below, I’ve marked off 8” from the underarm downwards on either side
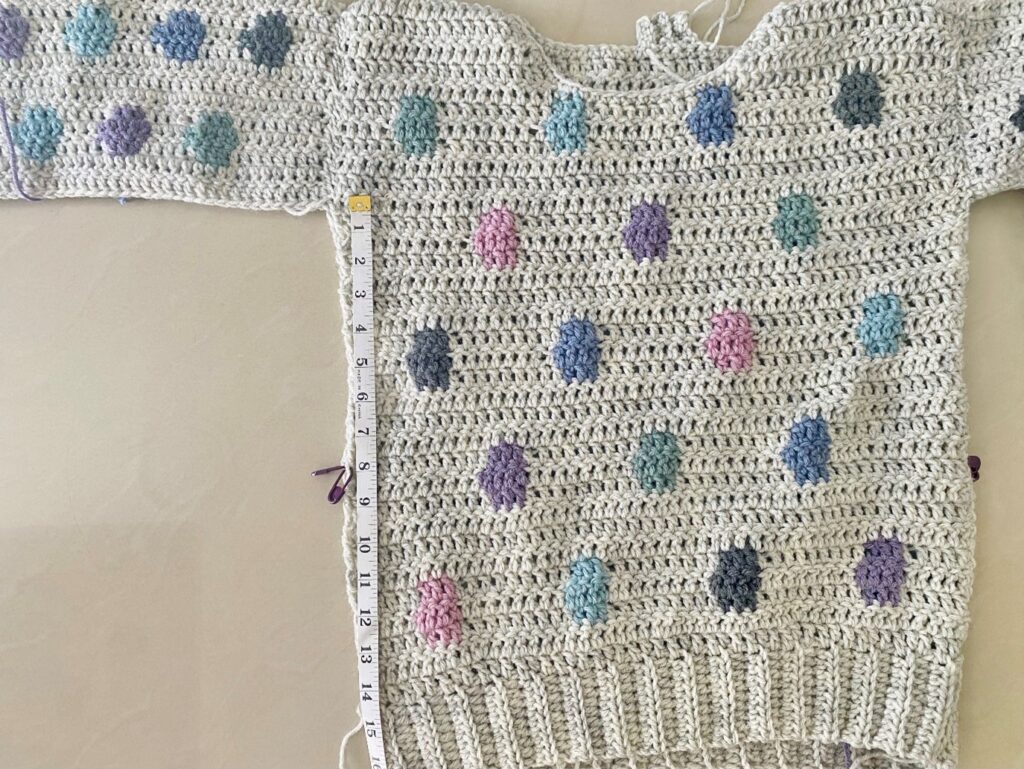
- Measure your palm (see image below) to get the width of the opening of the pocket (for me, it was 4”)
- Using this measurement, measure from the first SM downwards and mark off (SM2) – this will be the opening of the pocket – see image below
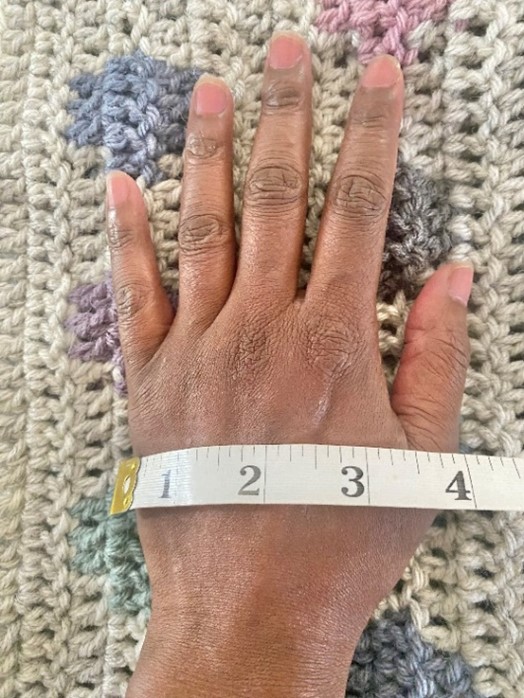
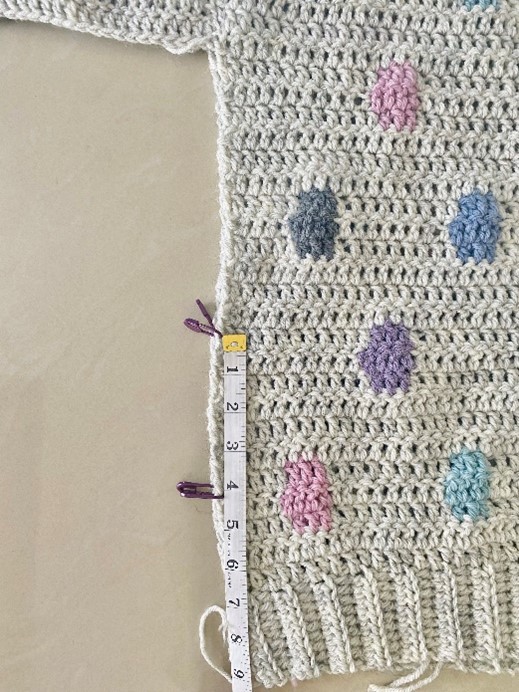
Image showing pocket marked off
Note – Remember to mark off both layers (Front and Back) on both sides for 2 pockets
- Seam along the sides of the sweater from sleeve to first SM and then from second SM to bottom edge of the cardigan – Leaving pocket opening unstitched
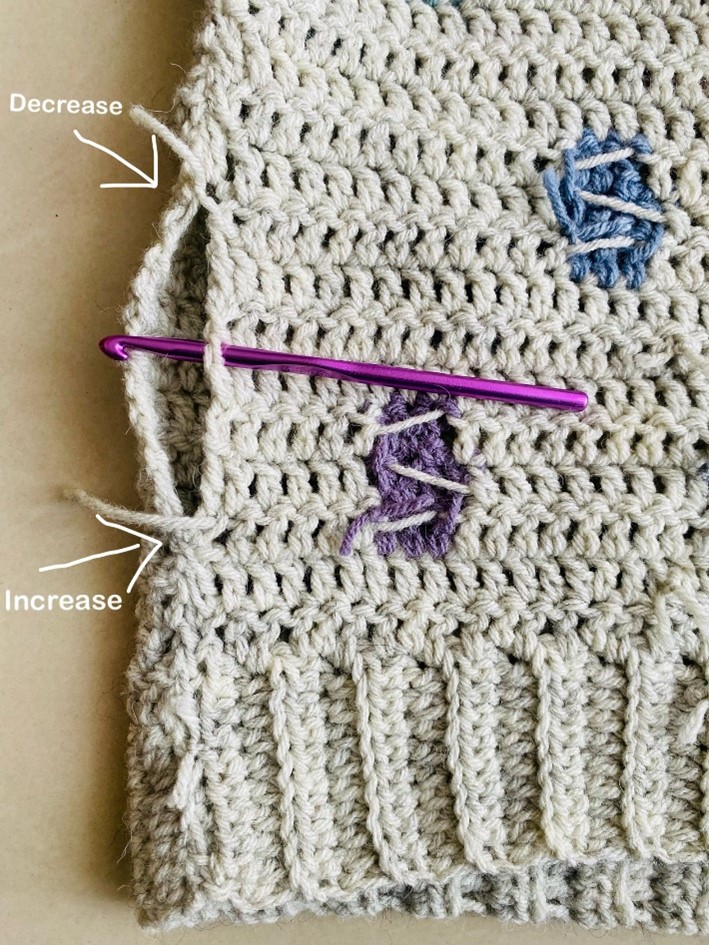
- Note: with regard to this pattern for the Pockets, SM1 is the top of the pocket (you will work a decrease at the top) and SM2 is the bottom of the pocket (you will work an increase at the bottom) – this increase/ decrease will cause the pocket to slant slightly which is ideal for side pockets
Pockets
Attach yarn to the pocket opening (WS) – see image below
R1
ch1, sc all around the opening of the pocket, sl st to join
R2
ch2, dc to top of the pocket (SM1) – work 1 decr, dc to bottom of the pocket (SM2) – work 1 incr, dc to end, sl st to join
Repeat R2 to the required depth of pocket (I repeated R2 6 times)
Second Last Round
ch2, dc, work decreases all around, sl st to join
Last Round – Optional
ch2, dc, work decreases all around, sl st to join
Fasten off, leaving a long enough tail to seam up the pocket – seam the pocket closed
Repeat for other pocket
Sleeve Ribbing
Ribbing – Using the 5,5mm hook
ch11
R1
Into the 3rd ch from the hook – hdc, hdc all ch’s
R2
ch2, turn, hdc all st’s (blo) – 10 st’s
Repeat R2 until the length of the Ribbing fits around the wrist
Fasten off, cut off excess yarn leaving a long enough tail to help with the seaming
Join both ends of Ribbing by seaming together
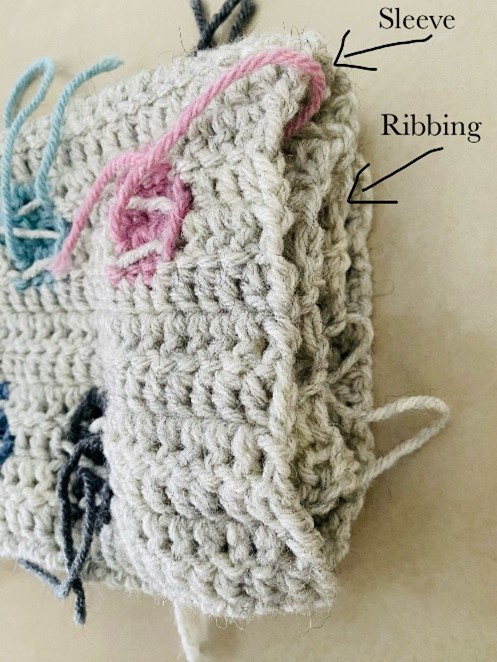
Fit Ribbing into sleeve – see image below – Attach Ribbing to bottom of sleeve by seaming together – gather up the sleeve to fit the Ribbing
Repeat for other Sleeve Ribbing
Neckline
Attach yarn to the neckline
R1
ch1, sc all around the neckline, sl st to join
Neckline Ribbing
Continuing from the Neckline
ch5
R1
sc into the 2nd ch from the hook, sc x 3, sl st x 2 into the neckline
R2
turn, sk sl st’s, sc x 4 (blo)
R3
ch1, turn, sc x 4 (blo)
Repeat R2 and R3 all around the Neckline
Fasten off, cut off excess yarn leaving a long enough tail to help with the seaming
Seam together ends of Ribbing to join
Fasten off, cut off excess yarn, weave in all ends to complete
HOW TO CHANGE YARN COLOURS
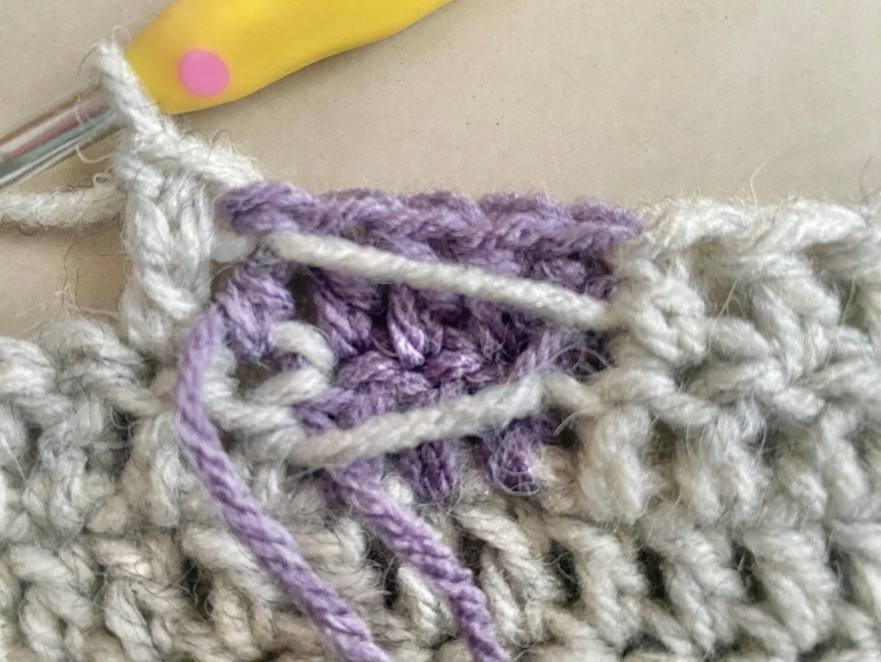
Image (1) Before changing yarn, into the last stitch, with two loops on the hook, bring in the change of colour
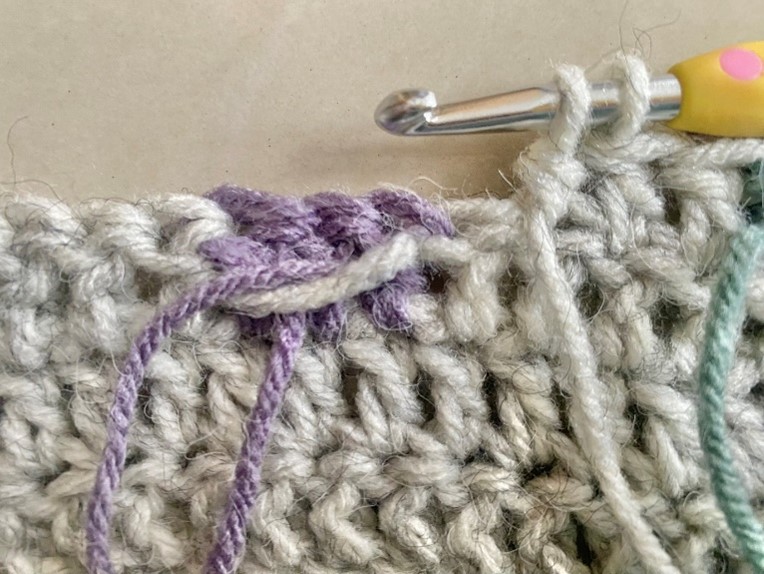
Image (2) Complete the last st in the base colour with the change of colour
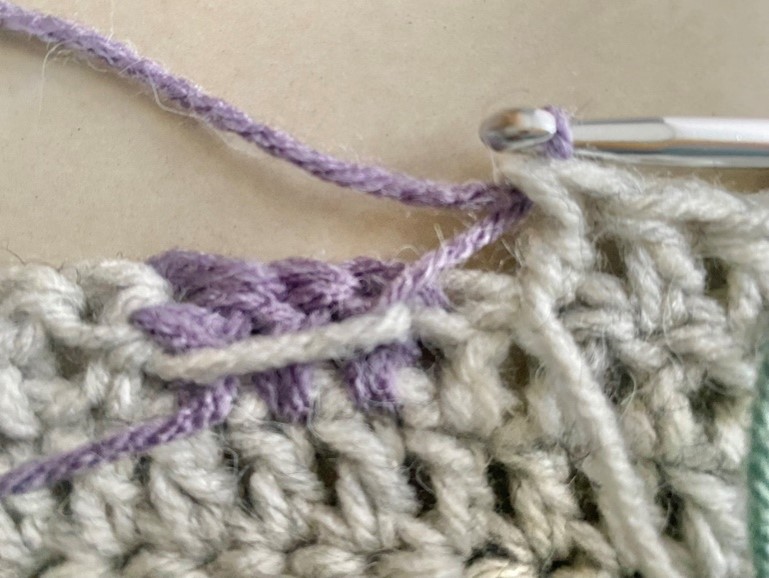
Image (3) Work the stiches in brackets ( ) to form the Polka Dot
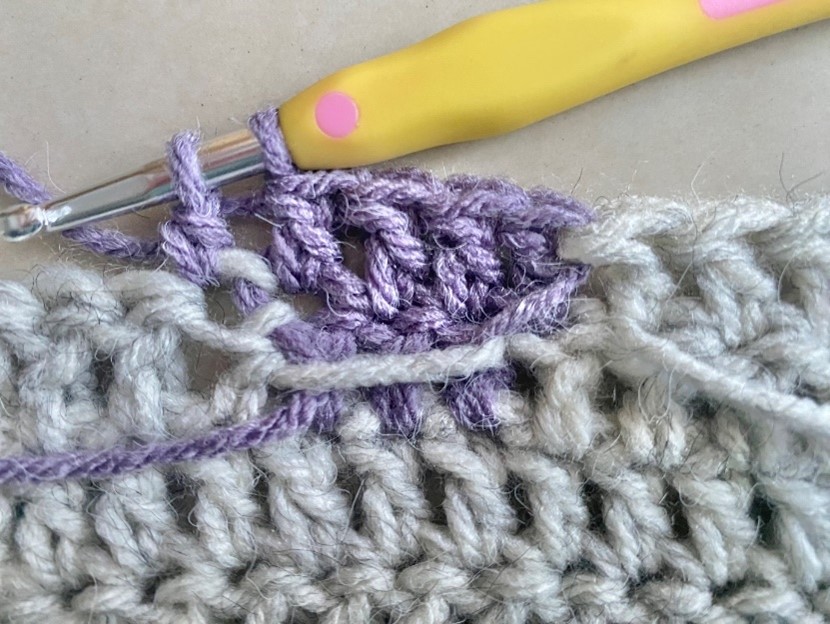
Image (4) Leave the last st from the brackets ( ) unfinished with 2 loops on the hook. Bring in the base colour to complete the stitch, then continue on with the pattern in the base colour until the next Polka Dot
Check out my video as stated above for a more detailed explanation.
