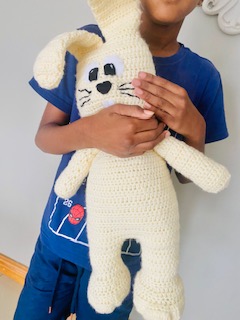
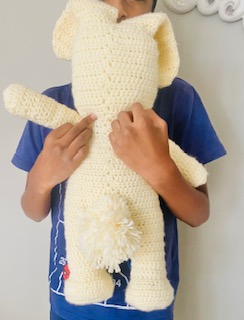
You will be amazed at how easy Mr Fumbles is to make. I used half double crochets throughout this pattern and made him quite big at 22inches or 56cm in length. He’s absolutely adorable with his facial features and pompom tail. I’ve provided a template for his facial features but if you wish to use googly eyes, or embroider eyes and facial features, by all means go ahead.
Pattern Notes
- This pattern makes use of US crochet terminology.
- Mr Fumbles measures 22inches or 56cm in length
- This pattern is worked in 8 parts: (A) Starting Round (B) Ear 1 and 2 (C) Head (D) Body (E) Arm 1 and 2 (F) Crotch (G) Leg 1 and 2 (H) Facial Features
- For this pattern, I used 100% Acrylic – Double Knit/ Light worsted/ category 3 yarn however cotton yarns in the same weight may also be used.
- This is an easy pattern. Stitches you need to be familiar with to work this pattern are Half Double Crochet (hdc) and slip stitch (sl st), in addition there are increases and decreases.
- ch2 counts as a stitch – half double crochet (hdc)
- Always count ch2 at the start of every Round as the first stitch
- Always turn after every Round
Video Tutorial
Use the following link on YouTube to access the tutorial
Materials
Materials need for Mr Fumbles
- Yarn/ wool 100% Acrylic OR Cotton light worsted/ category 3/ Double Knit – approx. 200g
- 3mm crochet hook
- Stitch markers x 4
- Scissors
- Yarn/Wool needle
- Pompom for the tail
Materials needed for the facial features
- Sewing needle and thread
- Felt for the eyes, nose and teeth/ Pattern template
- Fabric glue
- Yarn needle and black wool to stitch along the whiskers
Stitches and Abbreviations
Ch / ch = chain
st = stitch
sl st = slip stitch
hdc = half double crochet
sk = skip
yo = yarn over
R = Round
SM = stitch marker
decr = decrease
incr = increase
sl st = slip stitch
CF = Centre Front
CB = Centre Back
Increase (dc)
Work 2 hdc’s into 1 st
Decrease (dc)
yo, insert the hook into the st, pull up a loop, insert the hook into the next st, pull up a loop, yo, go through all 4 loops on the hook
Pattern
(A) Starting Round
ch 40
Join last chain to first chain to form a ring – Ensure that the chains are not twisted
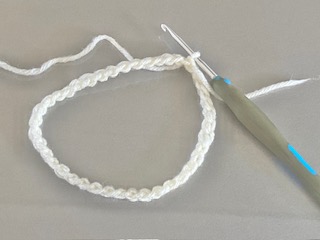
ch2, hdc all ch’s (40st’s in total including ch2)
Note: From this starting Round, we will work the ears on the upper side and the head on the bottom side
(B) Ear (1)
Continuing from the starting chain
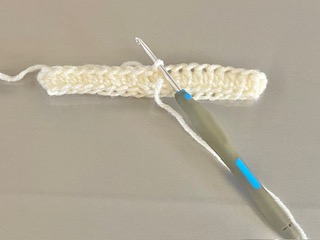
R1
ch2, turn, hdc into the next 19 st’s, sl st into the 2nd ch from ch2 to join (20st’s)
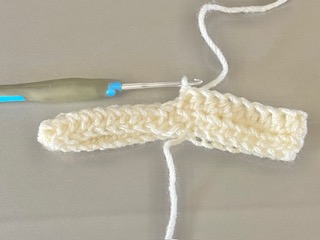
R2
ch2, turn hdc all st’s, sl st to join (20st’s)
R3 (Incr R)
ch2, turn hdc all st’s – incr into every 4th st, sl st to join
R4 – R15
ch2, turn, hdc all st’s, sl st to join
R16 – R17 (decr R)
ch2, turn, hdc all st’s – work 2 decr (one on either side of start ie, one into 1st and 2nd st and another into last two st’s), sl st to join
R18 – R19 (decr R)
ch2, turn, hdc all st’s – work 4 decr (two on either side of start), sl st to join
R20 (decr R)
ch2, turn, work decr into all st’s, sl st to join
Fasten off, cut off excess yarn
Ear (2)
Attach yarn to opposite side at CB.

Repeat as for Ear (1)
Fasten off, cut off excess yarn
(C) Head
Attach yarn to the underside of the starting Round at CB
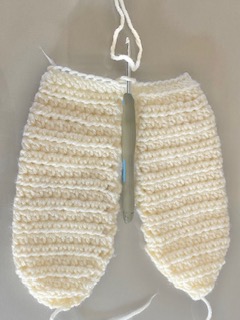
R1
ch2, turn, hdc all st’s, sl st to join (40st’s)
R2
ch2, turn, hdc all st’s, sl st to join
R3 (Incr R)
ch2, turn, hdc all st’s – incr into every 4th st, sl st to join
R4 – R8
ch2, turn, hdc all st’s, sl st to join
Find CF – Mark off with a SM (CF is opposite to CB)
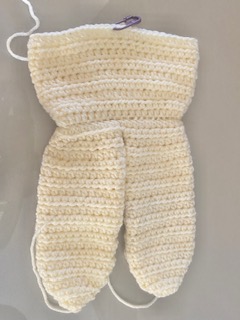
R9 (Incr R)
ch2, turn, hdc all st’s – Work 6 incr at CF (3 incr befor SM, hdc into CF – replace SM, 3 incr after SM), sl st to join
R10 – R13
ch2, turn, hdc all st’s, sl st to join – replace SM into CF
R14 (Decr R)
ch2, turn, hdc all st’s – Work 6 decr at CF (3 decr into 6 st’s before SM, hdc into CF, 3 decr into 6 st’d after SM), sl st to join
R15 – R16 (Decr R}
ch2, turn, hdc all st’s – decr into every 4th and 5th st, sl st to join
(D) Body
Continuing from Head
Count the number of stitches from R16 Head and adjust stitch count to 35st’s in R1 of the Body
R1
ch2, turn, hdc all st,s – adjust stitch count to 35st’s by incr or decr, sl st to join (35st’s incl ch2)
Note – Work incr or decr spaced throughout the R – do not work them consecutively
R2 (Forming the Armholes)
ch2, turn, hdc6, ch6, sk6, hdc10, ch6, sk6, hdc6, sl st to join
R3 (Incr R)
ch2, turn, hdc all st’s and ch’s – work incr into ever 4th st or ch, sl st to join
R4 – R5 (Incr R)
ch2, turn, hdc all st’s – work incr into every 4th st, sl st to join
R6 – R22
ch2, turn, hdc all st’s, sl st to join
Note: In R21 count number of stitches and adjust stitch count to 60 stitches in R22
Fasten off, cut off excess yarn
(E) Arm (1)
Attach yarn to the armhole
R1
ch2, hdc all around the arm opening, sl st to join (15st’s)
R2 – R6
ch2, turn hdc all st’s, sl st to join
R7 (Incr R)
ch2, turn, incr into next st, hdc to last st, incr into last st, sl st to join
R8 – R14
ch2, turn hdc all st’s, sl st to join
R15 (Incr R)
ch2, turn, incr into next st, hdc to last st, incr into last st, sl st to join
R16 – R17
ch2, turn hdc all st’s, sl st to join
R18 – R19 (Decr R)
ch2, turn, decr into all st’s, sl st to join
Fasten off, cut off excess yarn
Repeat for Arm (2)
Stuff Arms and Head with stuffing – Do not stuff the ears
(F) Crotch
Place SM’s into the following st’s – Counting from start – Start counts as the first stitch
3rd, 26th, 33rd, 56th
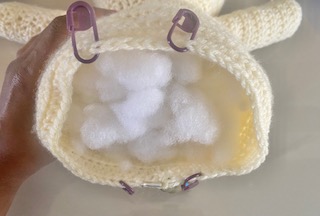
Seam together the 6 stitches at start (CB) and the 6 stitches at CF to join the crotch
The unseamed stitches on either side are leg holes (1) and (2)
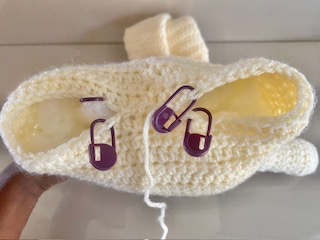
Stuff the Body with stuffing
(G) Leg (1)
Attach yarn to leg
R1
ch2, hdc all around the leg, sl st to join (26st’s)
R2 – R8
ch2, turn, hdc all st’s, sl st to join
R9 – R10 (Incr R)
ch2, turn, hdc all st’s – work incr into every 4th st, sl st to join
R11
ch2, turn, hdc all st’s, sl st to join
Find CF on leg – Mark with SM
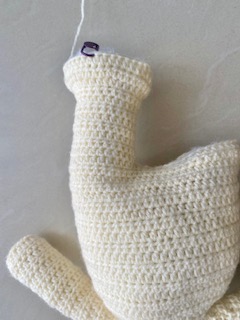
R12 (Incr R)
ch2, turn, hdc to 6 st’s before CF, 6 incr, hdc into CF, 6 incr, hdc to end, sl st to join – Replace SM into CF
R13 (Incr R)
ch2, turn, hdc to 4 st’s before CF, 4 incr, hdc into CF, 4 incr, hdc to end, sl st to join
R14 (Decr R)
ch2, turn, hdc all st’s, work decr into every 4th and 5th st, sl st to join
R15 – R16
ch2, turn, decr all st’s, sl st to join
Fasten of, cut off excess yarn – leaving a long enough tail to seam up the foot
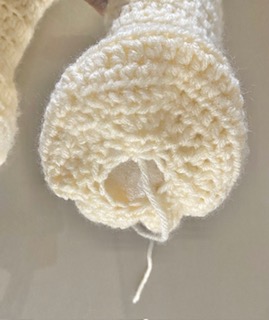
Stuff the leg with stuffing
Seam up the opening
Repeat for Leg (2)
(H) Facial Features
Cut out eyes, nose and teeth using the free template. Stitch on details onto eyes.
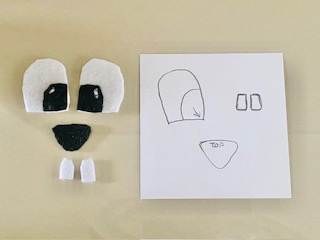
Stitch on the eyes and nose onto face
Stitch the whiskers using black yarn and a yarn needle
Stitch on a pompom for the tail
Weave in all ends to complete
