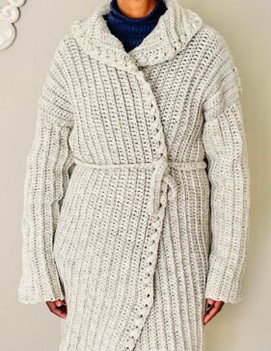
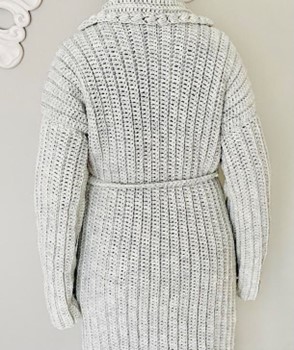
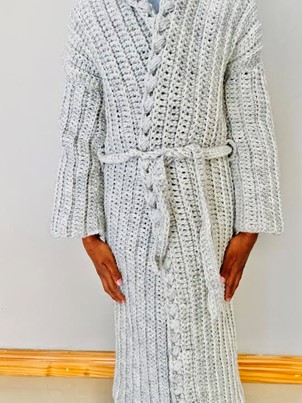
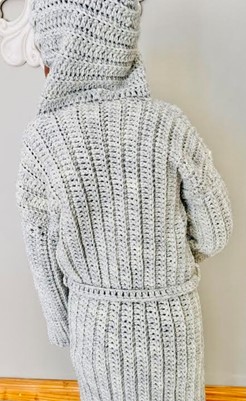
I had quite a few skeins of category 4 yarn in my yarn stash, hanging around waiting to be used, popping up every time I’m in that stash looking for yarn. This spelt a huge project but, surprisingly, it’s not the way it looks. The stitch pattern is easy and works up quickly. I made one for my son and another for myself. I have to admit, my gown is my most favorite possession in my cupboard.
Pattern Notes
- This pattern is for sizes:
- Child 2 yrs to 10 yrs
- Youth 12 yrs to 14yrs
- Adult Women XS, S, M, L, XL, 2XL, 3XL, 4XL, 5XL
- This Robe/Gown is made using one’s own body measurements – I use https://craftyarncouncil.com measurements as a guide for my sizing
- This pattern makes use of US crochet terminology
- Measurements are in inches (”) and centimetres (cm)
- Find measurements (cross back, armhole depth, arm length) in the pattern as you go along
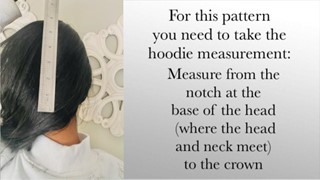
- You do need to take one measurement for this pattern – Hoodie
- Increase means working 2 or for this pattern 3 stitches (as indicated) into one stitch:
- inc – (2dc) – 2dc into one st
- inc – (3dc) – 3dc into one st
- Decrease means working one stitch into two stitches
- 3dc means 3 double crochets worked into one stitch
- 2dc means 2 double crochets worked into one stitch
- ch3 counts as a stitch
- Decrease – dec (dc) – yo, insert hook into 1st st, pull up a loop, insert hook into 2nd st, pull up a loop, yo, go through 3 loops on the hook, yo, go through 2 loops on the hook
- Decrease – dec (sc) – insert hook into the 1st st, pull up a loop, insert hook into the 2nd st, pull up a loop, yo, go through all 3 loops on the hook
- Puff Stitch (Puff st) – *yo, insert hook into the st, pull up a loop – elongate the loop*, Repeat from *to* 3 more times into the same st, yo, pull through all the loops on the hook, ch1 to secure
- Throughout the pattern, you will work your stitches (st’s) into the back loops only (blo) – unless otherwise stated
Stitches and Abbreviations
ch/ ch’s = chain/s
st/ st’s = stitch/ stitches
sc/ sc’s = single crochet/ s
dc = double crochet
sc = single crochet
blo = back loops only
sk = skip
Puff st = Puff Stitch
sl st = slip stitch
sp/s = space/es
yo = yarn over
WS = Wrong side
RS = Right Side
CB = Centre Back
R = Round
SM = Stitch marker
dec (dc) = decrease with a double crochet
dec (sc) – decrease with a single crochet
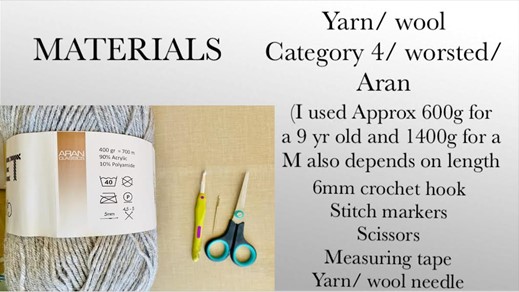
Materials
Video Tutorial
Check out https://youtu.be/Or6_QX0aqrs
Crochet Bathrobe/ Dressing Gown/ Nightgown
“Winter Warmer”
Pattern
Back Panel
Foundation Chain
Chain a length of chains to the desired length of the Robe/Gown (measuring from the neckline downwards to the length of the Robe/Gown required)
Note: After R1 the chain does stretch out therefore chain a length of chains 2,5”or 5cm shorter than the required length
R1 (work stitches into the back of the chain as opposed to working them into the front of the chain – work them into the little “bumps” that you see vat the back of the chain)
Into the 4th ch from the hook – dc, dc all ch’s
R2
ch1, turn, sc into the same st as ch1 (blo), sc all st’s (blo)
R3
ch3, turn, dc all st’s (blo)
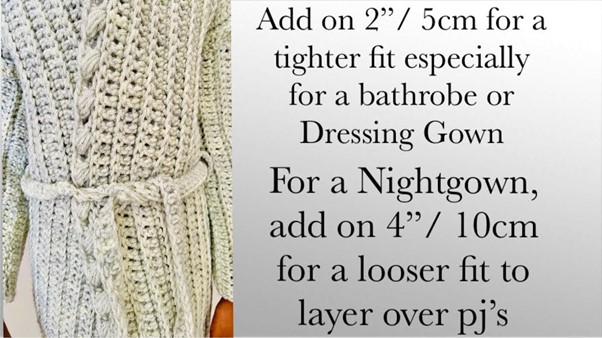
Repeat R2 and R3 to complete the back body panel – until the width of the piece measures the cross-back measurement plus 2”/ 5cm OR 4”/ 10cm – see image below
Do Not Fasten off
Cross Back measurements (remember to add on an extra 2″/5cm OR 4″/10cm)
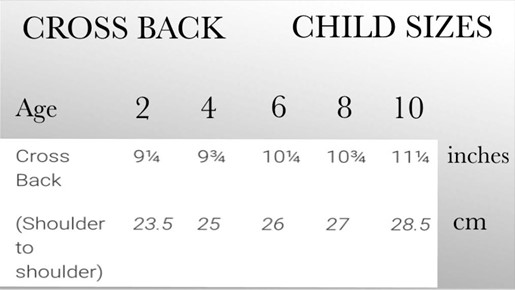
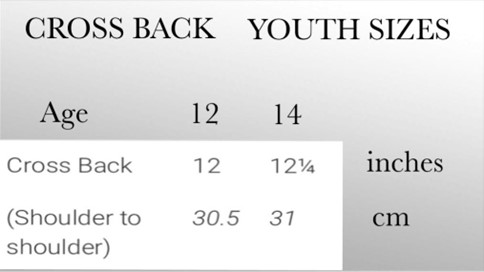
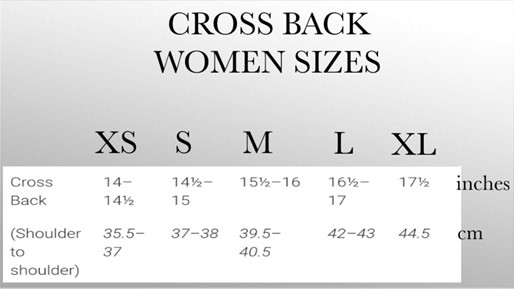
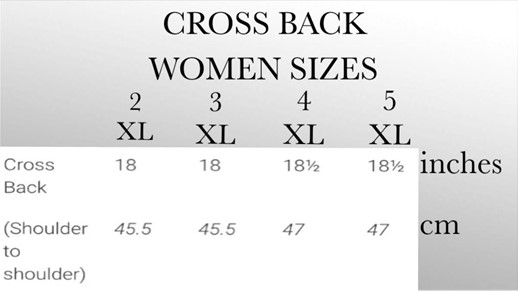
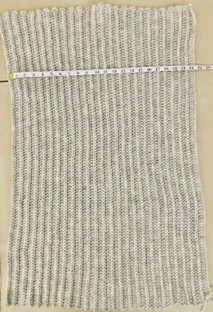
Image – Back body panel is complete
Mark off the neckline and armholes
Neckline:
Fold the back panel in half, lengthwise (top edge – the opposite side from where you had stopped on the back panel)
Place a SM along the folded edge – that is the CB
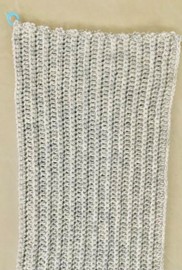
– Back body panel folded in half – CB marked
Child/ Youth Sizes – On either side of CB mark off 2”/ 5cm – (the total measurement along the neckline will be 4”/ 10cm)
Adult Sizes – On either side of CB mark off 3”/ 7,5cm – (the total measurement along the neckline will be 6”/ 15cm)
These 2 SM’s will serve as guides for the front panels
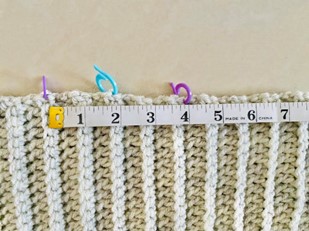
Remove the centre SM as it is no longer needed (for now)
Armholes:
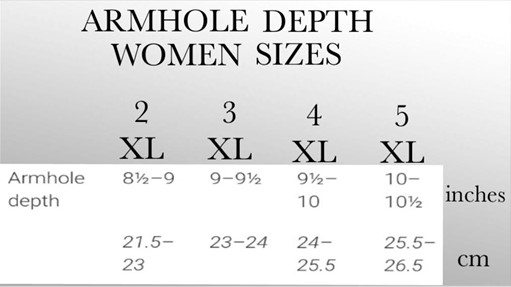
Along the length of the back panel, from the top edge, mark off the armhole depth. Place the measuring tape at the top edge and measure the armhole depth for the size plus 1”/ 2,5cm – mark it off with a SM
Count the number of stitches marked off and use that figure to mark off the armhole depth on the opposite side of the back panel
Note: the number of stitches for both armholes on either side of the back panel must be the same (Also jot down this number as you will need to use it when working the front panels)
Armhole Depth: (remember to add on an extra 1 inches/ 2,5cm):
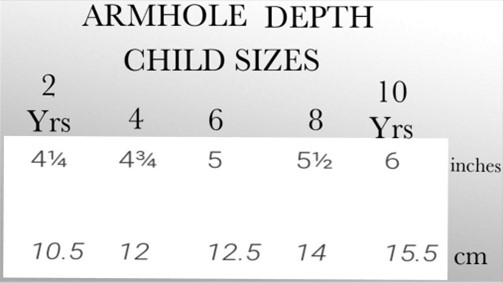
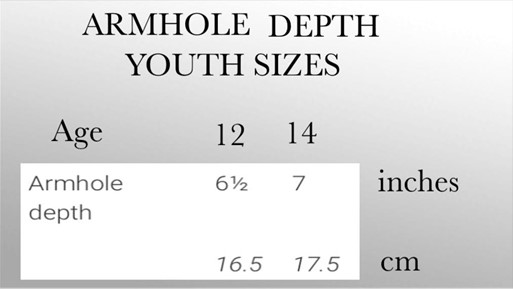
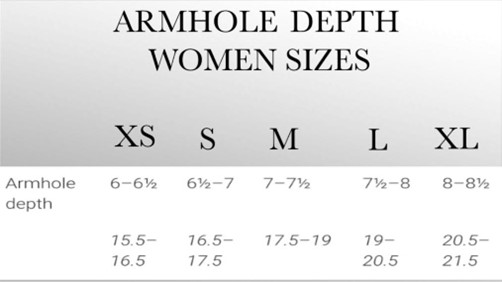
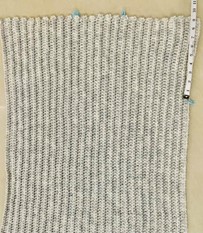
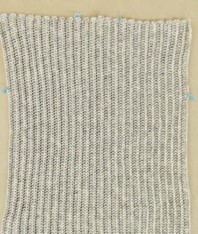
Images above – Armhole depths marked off
Front Side (1)
Continuing from back panel
R1
ch1, turn, sc into the same st as ch1 (blo), sc all st’s to SM (blo), chain the same number of st’s as armhole depth
R2
ch a further 2 ch’s, Into the 4th ch from the hook – dc, dc all ch’s (work st’s into the little “bumps” at the back of the chain), dc all st’s (blo)
R3
ch1, turn, sc into the same st as ch1 (blo), sc all st’s (blo)
R4
ch3, turn, dc all st’s (blo)
Repeat R3 and R4 until Front Side (1) when laid out flat on top of the back panel, reaches the 2nd SM at the neckline
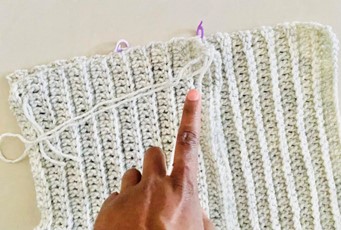
Fasten off – cut off excess yarn
Front Side (2)
R1
Chain the same number of chains as the armhole depth, join to the back panel on the opposite side of Front Side (1) – Join at the SM that marks of the armhole, sc all st’s (blo) from SM to bottom end
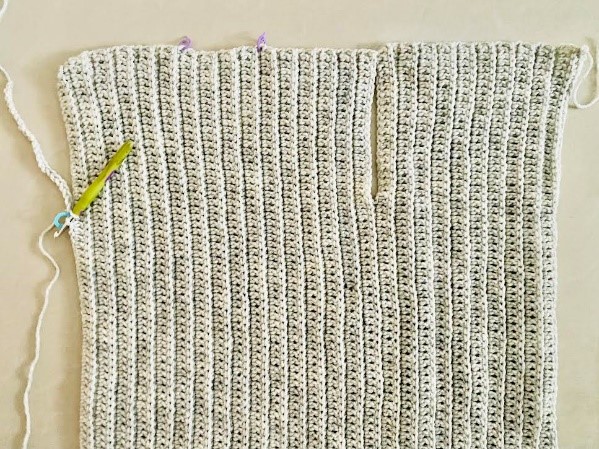
R2
ch3, turn, dc all st’s (blo), dc all ch’s (work st’s into the little “bumps” at the back of the chain)
R3
ch1, turn, sc into the same st as ch1 (blo), sc all st’s (blo)
Repeat R2 and R3 until Front Side (2) when laid out flat on top of the back panel, reaches the 2nd SM at the neckline
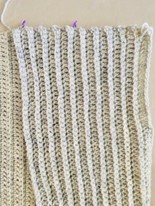
Fasten off – cut off excess yarn

Image above – Front side (1) and Front side (2) complete
Shoulder seams:
With the piece laid out flat, fold front side (1) on top of back – seam along shoulders to join front side (1) to back
Repeat for Front Side (2)
Seam along shoulders on either side – only seam from the outer edge to the 1st SM’s (outer SM’S) on either side of the shoulders

Image above – a portion of the front panels are left unseamed
Sleeve
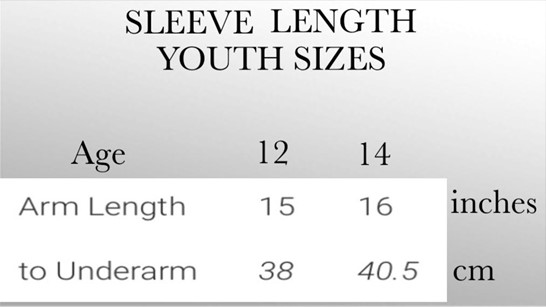
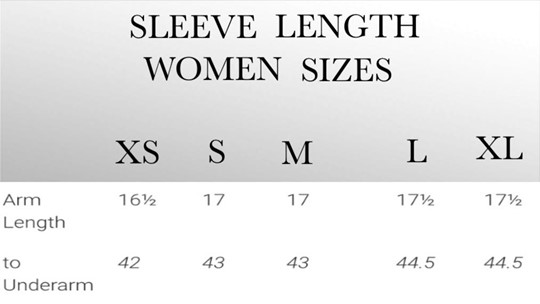
Chain a length of chains that measure the Sleeve Length measurement


R1 (work stitches into the back of the chain as opposed to working them into the front of the chain – work them into the little “bumps” that you see at the back of the chain)
Into the 4th ch from the hook – dc, dc to the end of the ch
R2
ch1, turn, sc into the same st as ch1 (blo), sc all st’s (blo)
R3
ch3, turn, dc all st’s (blo)
Repeat R2 and R3 to complete the sleeve – until the width of the sleeve when folded measures the same as the armhole and is able to fit the armhole
Fasten off – leaving a long tail to help with the seaming
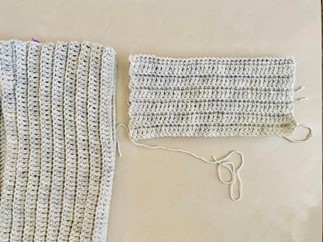
Bring both ends of the sleeve together (lengthwise) and seam to join and form a “cylinder”
Fit the sleeve into the armhole to attach – With the body WS facing out and the sleeve RS facing out – insert the sleeve into the armhole space – align the seams at the underarm and the seam along the sleeve – seam all around to join
Repeat for the other sleeve
Collar/ Hoodie
Attach yarn to the outer top edge (neckline) of the front panel on one side
R1
ch1, sc to the other end of the top edge of the front panel (so you are working from the front panel, along the back panel and back to the front panel on the other side) (Note: there are no stitches along the top edge to serve as a guide, therefore make certain that your stitches are evenly spaced and uniform (just as you would work them when you have st’s as a guide))
Place 3 SM’s along R1
- SM1 – at the 1st corner where the front meets the back
- SM2 – along the CB of the neckline – fold in half to find the centre
- SM3 – at the 2nd corner where the back meets the front
These 3 SM’s will serve as guides for the increases
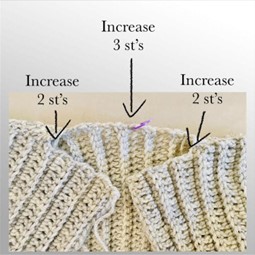
Note: from R2 to end – work all st’s including increases and decreases into the back loops only (blo) to complete the collar/ hoodie
R2
ch2, turn, dc into all st’s to SM, inc – (2dc), dc to SM at CB, inc – (3dc), dc to SM, inc (2dc), dc to last 2 st’s, dec
Note: ch2 counts as the 1st dec – do not work a st into this ch at the end of R3
R3
ch1, turn, sc to last 2 st’s, dec
Note: do not work the first sc into the same st as ch1 – this counts as the first dec
After R3 – depending on whether you wish to work the Collar or the Hoodie, continue to that section of the pattern
Collar
R4
ch2, turn, dc to last 2 st’s, dec
Note: ch2 counts as the 1st dec – do not work a st into this ch at the end of R5
R5
ch1, turn, sc to last 2 st’s, dec
Note: do not work the first sc into the same st as ch1 – this counts as the 1st dec
Repeat R4 and R5 until desired width of collar
Fasten off – cut off excess yarn – continue to Edging
Hoodie
R4
ch3, turn, dc all st’s
R5
ch1, turn, sc into same st as ch1, sc all st’s
Repeat R4 and R5 until the hoodie measures the hoodie measurement – see Pattern Notes
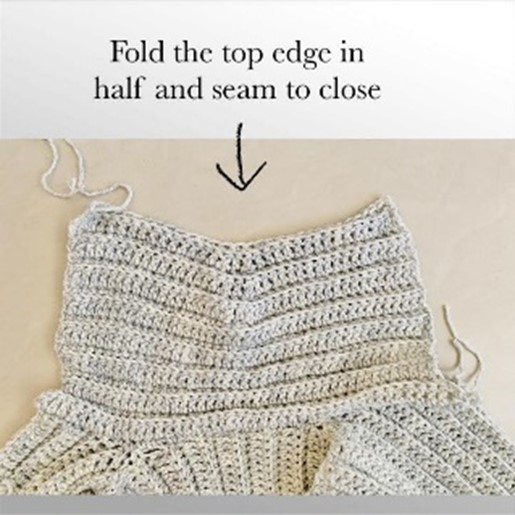
Fold along the width (top edge) of the hoodie – place a SM along the folded edge to mark off the halfway point – now, continue to decrease Rounds for the Hoodie
- Decrease Rounds – Hoodie
R1
ch3, turn, dc to 2 st’s before SM, dec (dc), dc into the st marked by the SM (replace SM), dec (dc), dc to end
R2
ch1, turn, sc into the same st as ch1, sc to 2 st’s before SM, dec (sc), sc into the st marked by the SM (replace SM), dec (sc), sc to end
Repeat R1 and R2 – Child sizes 3 more times, Youth sizes 4 more times, Adult sizes 6 more times
Fasten off, leaving a long tail to help with the seaming
Fold the hoodie in half again and seam together the top edges to close up the hoodie
Edging (Along the Front opening & collar/ hoodie)
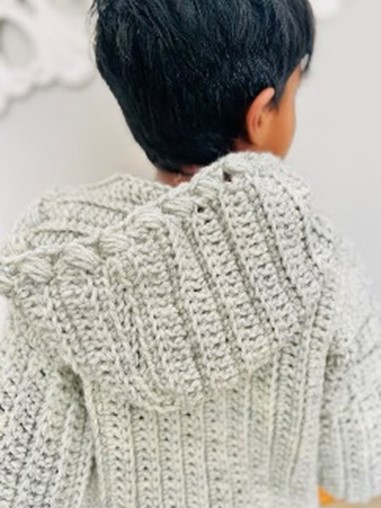
Attach yarn to bottom of the front opening, ch3, sk1, dc, Puff st into skipped st, *sk2, dc, Puff st into the last skipped st*
Repeat from *to* to the opposite end of the front opening, ending with dc’s if need be
Note – There will be a section along the collar/ hoodie where there are no actual stitches to work into – work the stitch pattern uniformly/ evenly spaced across that section
Fasten off – cut off excess yarn
Belt/ Tie
Chain a length of chains – as long as need be for the belt
R1
Into the 4th ch from the hook – dc, dc all ch’s
Fasten off – cut off excess yarn – weave in ends
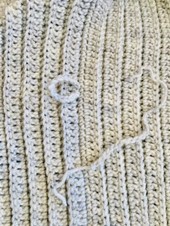
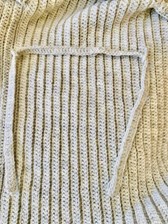
For the 2 little loops that hold the belt in place at the waist, chain a short length of ch’s (just enough for the belt to fit through).
Weave the tail ends of the chain into the post of a stitch on the Robe (at the waist) – Knot on the WS and weave in the ends – see image below – Repeat for the other side
Pocket x 2
Chain a length of chains (as long as the hand for the size you are making) (length from wrist to tips of fingers)
R1 (work stitches into the back of the chain as opposed to working them into the front of the chain – work them into the little “bumps” that you see at the back of the chain)
Into the 4th ch from the hook – dc, dc all ch’s
R2
ch1, turn, sc into the same st as ch1 (blo), sc all st’s (blo)
R3
ch3, turn, dc all st’s (blo)
Repeat R2 and R3 to the desired width
Fasten off – leaving a long tail for seaming
- For best placement – fit on the Robe and then decide on placement of pockets – Seam onto Robe leaving the top edge unseamed
Weave in all the ends to complete 😊
